
How to Use Clear Builder Gel on Natural Nails: Complete 2026 Guide
By Sharly Le, Former Nail Tech | 5 Years of Professional Experience
After working with clients who had weak, peeling, and easily broken nails, I learned that clear builder gel can be one of the most effective ways to help natural nails grow longer while staying protected. When applied correctly, it adds strength, structure, and a smooth protective overlay without making the nails look bulky.
Clear builder gel is a high-viscosity nail enhancement used to reinforce natural nails and support healthy growth.
What Is Clear Builder Gel?
Clear builder gel is a thicker gel formula designed to strengthen and support natural nails. It creates a smooth overlay, helps build a subtle apex, and gives weak nails extra durability.
Unlike regular gel polish, builder gel is made to add structure. That makes it a better choice for people with thin, soft, flexible, or easily broken nails.
From my experience as a nail tech, this is one of the most helpful products for clients who want their natural nails to grow without constant breakage.

Why Use Builder Gel on Natural Nails?
Clear builder gel is popular because it helps natural nails stay stronger and longer. It can reduce breakage, support nail growth, and create a clean, natural-looking manicure.
It is especially useful if you:
-
Have weak, thin, or peeling nails.
-
Want your nails to grow longer without snapping.
-
Prefer a glossy, natural finish.
-
Want a stronger base for gel polish or nail art.
When clients ask me for something that looks natural but still gives real support, builder gel is usually one of the first options I recommend.

Builder Gel vs Gel Polish (non-builder)

Detailed 8 steps to apply builder gel on natural nails
Here is the exact 8-step process I use for applying clear builder gel on natural nails, from prep through cuticle oil. Follow each step in order. Most lifting and chipping I see comes from rushing prep or skipping the apex build, not from the gel itself.
Step 1: Prepare the necessary tools
Before you start applying builder gel on natural nails, you need to prepare all the necessary tools so the process goes smoothly. This includes:
- Builder gel (a type suitable for natural nails)
- Base coat (if your builder gel doesn’t contain a base component)
- Top coat
- UV or LED lamp
- Nail file and buffer
- Alcohol wipe at least 75%
- Dust brush
- Nail/cuticle oil (optional)
Step 2: Prepare your nails
Preparing the nails is a crucial step that helps builder gel adhere firmly and minimizes lifting over time. This includes:
- Wash your hands thoroughly and dry them completely.
- File your nails to the desired shape.
- Gently push back the cuticles around the nail edges.

- Lightly buff the nail surface to remove natural oils and add texture.

- Wipe away dust and oils with alcohol or a nail cleanser.

Tip: Do not over-buff, as it can thin the natural nails and make builder gel lift more easily.
Step 3: Apply a base coat
If you’re using a builder gel that does not contain a base component, apply a thin layer of base coat before you begin. After that, be sure to cure under a UV lamp for 60 seconds to dry the base layer.
Step 4: Apply the first layer of builder gel
Take a small amount of builder gel with your brush. Then apply a very thin layer to cover the entire nail surface to help the gel adhere better. Finally—and this is very important—cure under UV for 60 seconds.
Step 5: Build thickness and the apex
After the first layer of builder gel has cured, take a small amount of builder gel with your brush and place it in the center of the nail. Then gently guide the gel from the center toward both sides in a zigzag motion to create a natural apex.
Next, flip your hand upside down for a few seconds so the gel self-levels toward the center, helping the nail achieve even thickness. Finally, cure under a UV/LED lamp for about 60–90 seconds, depending on the thickness of the gel layer.
From years of doing this in salon, the flip-and-self-level technique is the single thing most home users skip — that's where the bumpy finish comes from.

Step 6: Perfect the surface
After the second sculpting layer of builder gel has cured, observe the nails and lightly file to refine the shape if needed. You can use alcohol wipe to wipe away any excess gel around the nail and remove all the dust before applying top coat.
Step 7: Apply top coat
Apply a thin layer of top coat to seal everything together, add shine and better protect the builder gel, then cure under UV lamp for 60 seconds. Lastly, wipe off any remaining tacky residue (if your top coat is not a no-wipe formula).
Step 8: Apply cuticle oil
Use the nail/cuticle oil you prepared to deliver moisture to the skin around the nails. To help the oil absorb evenly, gently massage around the nails to keep them healthy.

If the gel feels warm during curing, briefly remove your hand and continue once the heat spike passes. Base coat and color layers stay tacky until the top coat is cured.
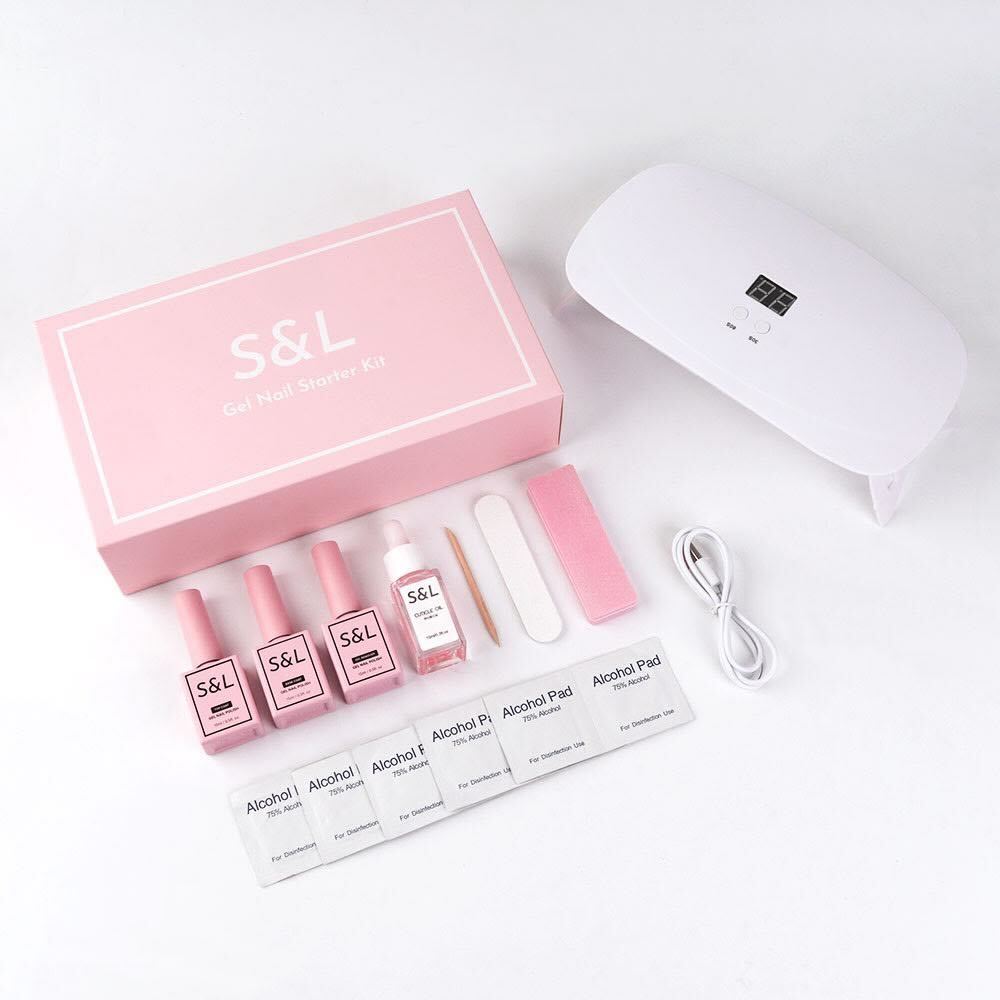
Get the Professional Strength Trio Set Here

Soft Builder Gel vs Hard Gel
There are a few common types of builder gel, and the right one depends on your needs. They may look similar, but the purpose and texture are different.
Soft builder gel is more flexible, easier for beginners to apply, and often easier to remove. It is typically sold in a bottle and is often referred to as BIAB, or builder in a bottle. It is used to add a slightly thicker protective layer and help create a subtle apex.
Hard gel is more rigid, thicker, and usually requires a brush to sculpt. It is harder to remove and is often used for extra structure or long extensions.
For most natural nail overlays, soft builder gel is the most beginner-friendly option.

| Feature | Soft Builder Gel | Hard Builder Gel |
| Beginner Friendliness | Easier to control and shape. | Steeper learning curve. |
| Flexibility | More flexible; works well with the natural nail. Often comes in a "brush-in-a-bottle" format. | Less flexible and more rigid. Primarily used for nail extensions in professional salons. |
| Strength | Excellent for overlays and light reinforcement. | Superior for extra strength and architectural structure. |
| Best For | Natural overlays, flexible nails, and simple applications. | Long enhancements, brittle nails, and maximum durability. |
| Application | Self-leveling and easy to apply with the included bottle brush. | Requires a separate sculpting brush to manipulate the thick consistency. |
| Removal | Typically soak-off (if formulated as a soft gel). | Must be filed off; generally non-porous and resistant to acetone. |
Refill and upkeep
As your nails grow, a gap appears between the cuticle and the builder gel. At that point, you do not always need to remove the entire enhancement.
In many cases, a refill is the better option. The surface is lightly filed until the color is removed, the nail is cleaned of dust and debris, and then builder gel is applied to fill the grown-out area and smooth the surface.
Builder gel should always be removed according to the product instructions. Some formulas are soak-off, while others are designed to be filed and filled.
If you wear builder gel regularly, refills can help keep the protective layer in place while maintaining a polished look.
Removal
If you want to take a break, removal should be done carefully to avoid damaging the natural nail.
The safest method depends on the product formula. In some cases, a drill is used to reduce the bulk first, then the remaining product is removed with either an acetone method or a gel remover designed for faster breakdown.
Once you are close to the natural nail, follow the removal method recommended by the product:
Acetone method for a traditional soak-off approach.
Easy gel remover for a faster and easier option.
Tips to make builder gel last longer on nails
Many users are understandably frustrated when their builder gel lifts and looks unappealing after a short time. Therefore, you should keep the following in mind to help builder gel last longer:
- Remove dust, oils, cuticles, and debris so the builder gel adheres more securely.
- Create just enough surface texture for adhesion, but do not over-buff, as it will thin the nails.
- Avoid touching the nail surface between coats.
- Apply thin layers and cure thoroughly to prevent lifting.
- Do not let builder gel touch the skin or cuticles, as it can cause edge lifting.
Notes when applying builder gel on natural nails
When applying builder gel on natural nails, there are several important notes to help you avoid lifting and cracking while keeping your nails healthy:
- Use builder gel formulated for natural nails or a combined base + builder gel to save steps.
- Prioritize products with strong adhesion and good flexibility to reduce breakage.
- Do not apply a thick layer at the start; it may flood the cuticle area or cause heat spikes during curing.
- If builder gel touches the skin, it can cause edge lifting and create gaps where bacteria can accumulate.
- Keep a 0.5–1 mm gap from the cuticle line when applying gel.
- Place the builder gel in the center of the nail, then gently guide it toward both sides to form a natural apex.
- If gel floods the sidewalls, wipe it off immediately before curing.
- Follow curing times, as each builder gel may require different curing durations—typically 60–90 seconds.
- Nourish your nails and the surrounding skin regularly with cuticle oil.
Common Mistakes to Avoid
|
Common mistake |
Cause |
How to fix |
|
Builder gel lifting |
Contact with skin; oils not fully removed |
Prep thoroughly; keep gel off the cuticle line |
|
Early cracking/breakage |
Layers too thin or too thick |
Build appropriate thickness; control the apex |
|
Heat spikes while curing |
Layer too thick |
Apply thinner layers; cure in stages |
|
Gel not fully cured |
Insufficient curing time or a weak lamp |
Check lamp power and cure for the full time |
In most cases, early lifting comes from prep or application mistakes rather than the builder gel itself. I see lifting from cuticle contact more than any other reason.
Shop the Pro Lamp for All Use Purposes

Frequently Asked Questions
Is builder gel safe for natural nails?
Yes, when it is applied and removed correctly. The main risk usually comes from peeling or aggressive removal.
Can I put color over clear builder gel?
Yes. Clear builder gel is a great base for gel polish, nail art, or a natural glossy finish.
Do I need a special lamp?
Yes. Builder gel must be cured with a UV or LED lamp that matches the product instructions.
Is builder gel good for weak nails?
Yes. That is one of the main reasons people use it.
Ready to Try It?
If your natural nails never seem to stay long, clear builder gel may be the support they need. It gives your nails the strength to grow while keeping the finish clean, glossy, and natural-looking.
Ready to strengthen your nails? Shop our clear builder gel and find the right formula for your routine.

Leave a comment
This site is protected by hCaptcha and the hCaptcha Privacy Policy and Terms of Service apply.